For the complete documentation index, see llms.txt. This page is also available as Markdown.

9. Release Tests

Release Tests help you create reusable checks for important app workflows before you publish or hand an app to users. They are designed for practical smoke and regression testing: confirm the key paths still work, catch obvious breakages, and keep a record of what was run.

Release Tests are not a replacement for human review. You should still check layout, wording, permissions, unusual edge cases, and the parts of the user experience that need judgement.

Open the Tests section

  1. Open your app in the Buzzy Workspace editor.

  2. In the left navigation, go to Release.

  3. Select Tests.

The Tests panel is titled Release Tests. It lets you define reusable tests for the app, then run them as a suite against the live runtime.

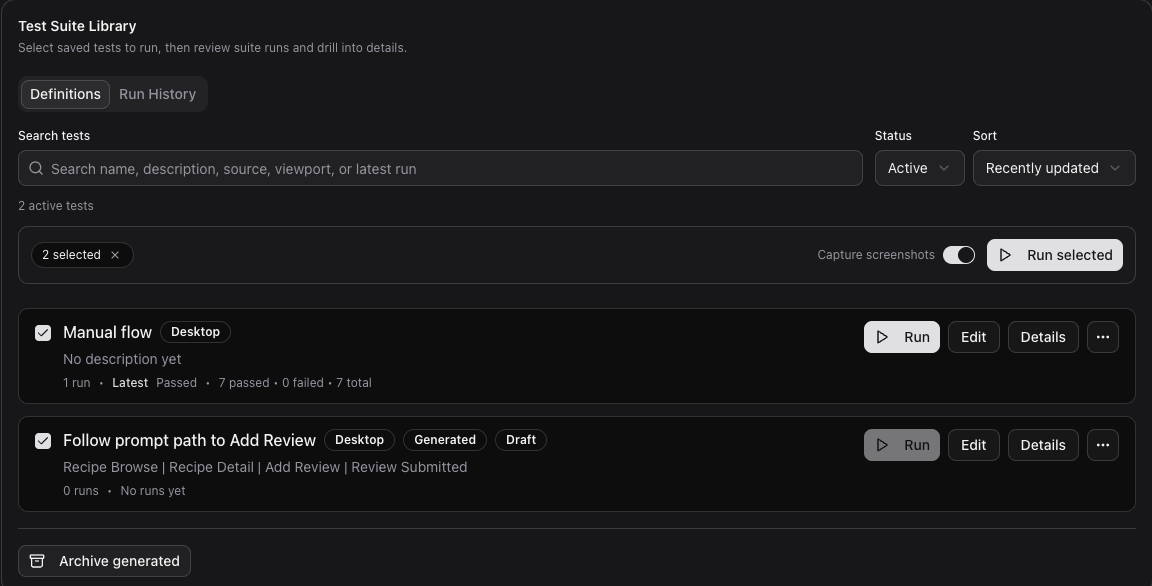
Test Suite Library

The main area of the Tests section is the Test Suite Library. It has two main tabs:

  • Definitions: saved tests you can search, filter, edit, run, duplicate, archive, or restore.

  • Run History: suite run history, including the status of previous test runs.

Each saved test can show:

  • its name and description

  • viewport target, such as Desktop, Tablet, or Mobile

  • whether it was created manually or generated

  • active, draft, archived, or disabled status where relevant

  • latest run status

  • how many runs have been recorded

Use search, status filters, and sorting when the list grows. Archived tests are hidden from the active list until you switch the status filter or restore them.

Create tests

The Tests section supports reusable test definitions.

Manual test creation is the available authoring path. The two AI-assisted creation options, Generate starter tests and Add test from prompt, are shown as Coming soon in this workflow.

Generate starter tests Coming soon

The UI includes a Generate starter tests option labeled Coming soon. It does not create tests in this workflow.

Use Create manually to build the tests you want in the suite.

Add test from prompt Coming soon

The UI also includes an Add test from prompt option labeled Coming soon. The intended input is a plain-language test description such as:

This prompt-based workflow is designed around:

  • choose one or more viewport targets

  • describe the user flow, expected proof points, and any important runtime details

  • generate one or more saved test definitions

For this workflow, write the test manually and use Record to capture supported interactions from the preview.

Create manually

Use Create manually when you want direct control over the script.

The Create test dialog asks for:

  • Name

  • a short description of what the test should cover

  • Viewport target

After creation, the authoring workspace opens. A new manual test starts with a visit step so the test has a runtime page to begin from.

Author a manual test

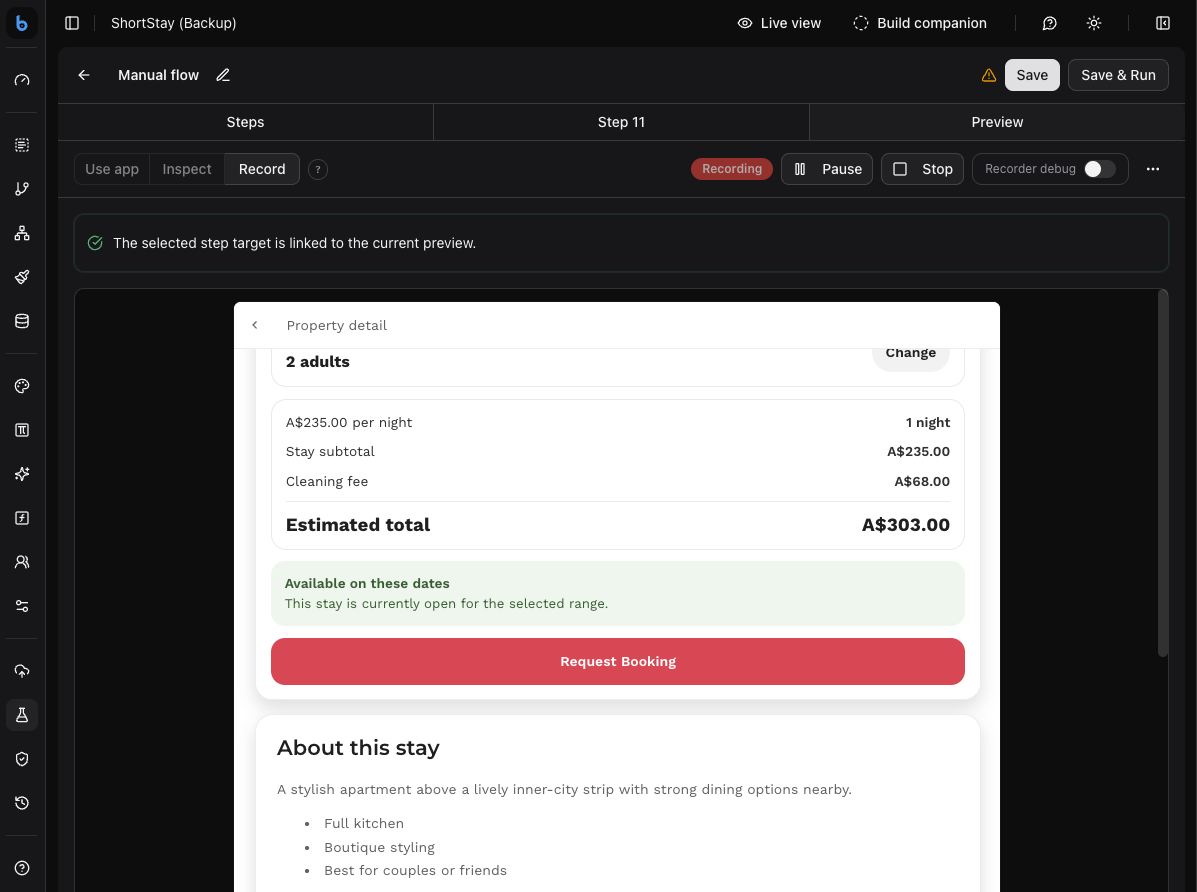
Manual authoring has three working areas:

  • Steps: the scripted actions and checks in order.

  • Details: the selected step's type, target, value, and supporting information.

  • Preview: the app runtime shown inside the editor so you can inspect or record actions.

Buzzy manual test authoring workspace in Record mode, showing a live app preview and recording controls.
The manual authoring workspace lets you inspect or record steps against the app preview.
Use Add or Add after to insert steps. Use the previous and next step controls to move through the script. Common steps include visiting a route, clicking a test ID, filling a field, waiting for an element, and asserting that something is visible.

The Preview area has three modes:

  • Use app: interact with the runtime normally.

  • Inspect: select runtime targets without triggering their actions. This is useful when choosing buttons, fields, or visible proof points for a step.

  • Record: capture supported clicks and field input from the preview into the test script.

When you choose Record, Buzzy shows Start recording steps with a short checklist. Make sure the preview is on the right starting screen, then click buttons, links, and fields in the preview. Recorded steps appear in the script so you can review and adjust them before saving.

Use Save Test or Save Changes to save without running. Use Save & Run when you want to save the script and immediately execute it.

Viewport targets

Release Tests can target:

  • Desktop

  • Tablet

  • Mobile

Viewport target is set when the test is created and cannot be changed later. Create a separate test for another target when you need coverage across different screen sizes.

Run tests

Buzzy Test Suite Library with two saved tests selected and Run selected visible.
Select saved tests in Definitions, then use Run or Run selected to execute them.
From Definitions, you can:

  • run one test with Run

  • select multiple tests and click Run selected

  • edit or view Details for a saved test

  • archive, restore, duplicate, or regenerate supported generated tests from the actions menu

Runs execute against the live runtime. If the app or environment needs time to respond, a run may briefly show queued, starting, or running states before it passes or fails.

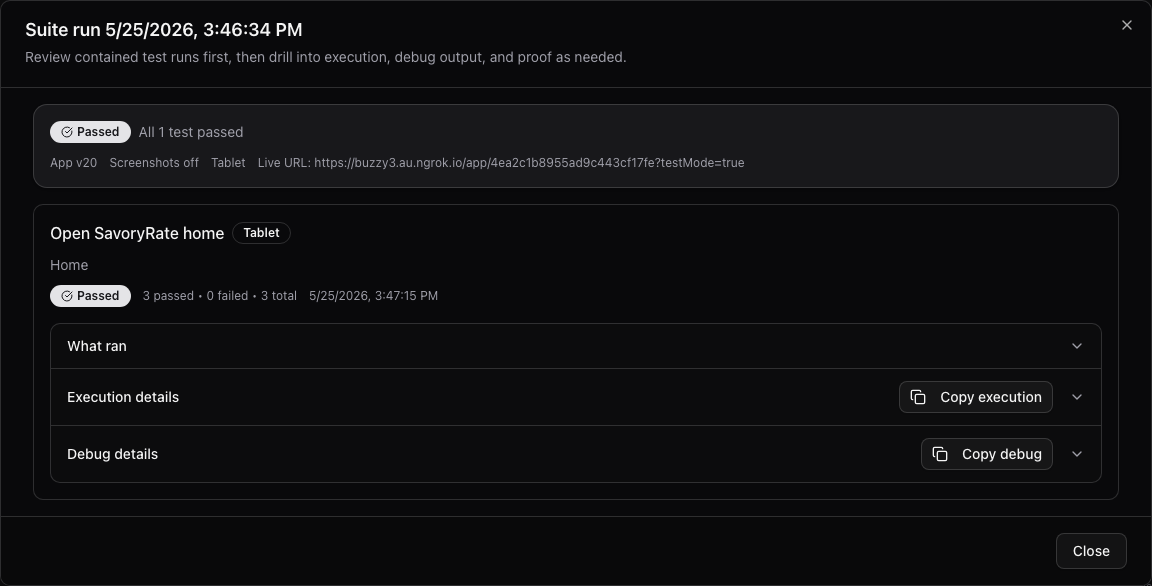
Buzzy suite run detail dialog showing a passed test with What ran, Execution details, and Debug details sections.
Open run details to review pass/fail status, step information, execution details, debug output, and proof where available.

Read run results

Use Run History to review suite history. A suite run can include:

  • overall status

  • app version information where available

  • viewport summary

  • live URL

  • individual test runs

  • planned steps and step results

  • execution details

  • debug details

  • proof screenshots, when captured

Step summaries may show passed, failed, pending, or planned-only results. If only planned steps are available, treat that as an incomplete run record rather than proof that every step passed.

When a run fails, open the run details and look for the first failing step. Fix the app or the test at that point, then rerun. Avoid rewriting steps that already passed unless the user flow itself has changed.

  1. Start with the main user journeys: login, key forms, important navigation, submissions, permissions, and the workflows users rely on most.

  2. Create a small manual suite.

  3. Review each test definition before trusting it.

  4. Run the suite before publishing.

  5. Fix app issues or refine tests.

  6. Rerun the suite until the important tests pass.

  7. Keep useful tests active and archive stale tests.

For broader testing strategy, see Testing Approaches.

For a broader product overview, see Buzzy Next or watch the Buzzy Next release video.

Release Tests work best as repeatable checks for important paths. Use them alongside preview testing, live app checks, permission review, and real user feedback.

Last updated